Initial Sampling Inspection Autarkic
PPAP, PPF and Initial Sampling Inspection (EMP) are procedures mandatory for suppliers. Conformance with regard to material, form and function must be proven before starting serial inspections. The most extensive of these procedures is the initial sampling inspection report that compares and documents the measuring values for the initial sample against the specifications.
To provide an initial sampling inspection report a communication needs to be established between customer and supplier. AHP has developed a software component that focuses on optimizing this communication by creating the easiest process for the supplier from receiving the measuring task to capturing the measuring results.
Workflow
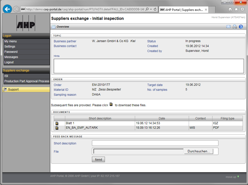
The supplier gets the measuring software iQ-EMP/AUTARK from the customer for performing the measuring tasks. A measuring task file can be provided to the supplier by uploading it into the CAQ-PORTAL or by sending it using an email. The measuring results will be stored into the file and then be sent back either using the portal or email.
Important Features at a Glance
The way to the supplier
- The customer uses the iQ-EMP software of AHP to create a measuring task file and uploads this file to the CAQ-PORTAL or sends it by mail to the supplier.
- The supplier gets the autarkic measuring software by downloading it from the portal or the classical way by receiving a CD.
- The supplier opens the iQ-EMP/AUTARK measuring program and reads the file. The only form shown to the user consists of three tabs (Order, Initial Sampling Inspections and Documents).
- The inspection order data contains the information most important to the supplier. This data is prescribed or will be completed by the supplier. The list of fields covers the information required by the PPAP report.
- The fields completed by the supplier will be taken over into the initial sampling inspection order and/or the PPAP report on the server after the return of the finished measuring task.
The inspection
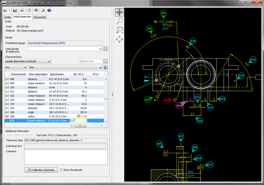
Clicking the Initial sampling inspection tab displays the inspection environment.
- Depending on the number of parts a corresponding number of columns are provided for holding the measuring values.
- The user can press the arrow keys to navigate to the next characteristic for inspection. The selected characteristic will be highlighted in the drawing on the right. Inversely, it is possible to click the drawing to navigate to the next characteristic for inspection. How this is controlled depends on configuration settings. The software supports horizontal (inspect one characteristic for all parts) and vertical (inspection all characteristics for one part) inspection orders. After a measuring values has been captured the corresponding stamp is colored in GREEN (value is ok) or RED (value is not ok).
- If a part has to be measuring using a specific measuring equipment that is shown to the operator in the head part of the measuring task.
- If measuring values violate the specification limits the operator is prompted for a comment.
- For example, to document failures on characteristics or a specific inspection procedure it is possible to assign pictures to the corresponding characteristic (picture capturing).

Connecting measuring devices
- In addition to manually entering single measuring values an automatic import from external sources (such as 3D measuring devices) is supported, too. Repeated measuring tasks are performed using an integrated "Import filter".
Generating documents
- On the Documents tab the supplier can add any kind and number of accompanying reports and enclosures.
- The initial sampling order for the suppler is sent together with a print template (Word document template) for the initial sampling inspection report of the VDA. By clicking the Report command button (not shown in screenshot) the initial sampling inspection report will be generated in the VDA format.
The way back
- If any measuring of the task has been completed the supplier either uploads the processed file to the CAQ-PORTAL as a document or sends it to the customer as an email attachment.
- At the customer the measuring values are imported into the initial sampling inspection order (measuring values of the supplier).
- The inspection staff of the customer is then able to inspect the same sample within the same inspection order (counter measurement).
- Afterwards the initial sampling inspection is finished so that it is possible to make an initial sampling inspection (EMP) decision.
Interfaces to Other Modules
- iQ-PLAN as base module for managing inspection specifications created from drawings
- iQ-PAUF as base module for performing different kinds of inspections by entering measuring values manually or automatically from a measuring device
- CAQ-PORTAL for a B2B communication over the Internet
